|
| Home | About
Us | Moderators
| The
Prey | Articles
| Techniques
| Tech
Section | Product
Reviews | Sponsors
| Links |
Contact
Us | The
Predator Masters Forums | Photo
Gallery | Scholarships
|
![]()
![]()
By Robert Cobb (Stretch)
|
Disclaimer
Downloading copyrighted sounds from call manufacturers websites, for use as homemade calls, without their express written permission is THEFT!! There are no other words for this; it is illegal and punishable under copyright laws of the US and other countries. Predator
Masters
and its affiliates are strongly against using pirated sounds and in
no way condones the use of these instructions for the purpose of stealing
copyrighted information, software or electronic files and media. Use
of these instructions for the purpose of stealing could result in permanent
removal, and may keep any future instructional articles from being published.
There are free sounds all over the Internet that can be downloaded and
made to be just as effective as ANY commercial media!! Be responsible
and ethical..Don't ruin it for everyone!! |
![]()
|
Now
that you've created some sounds on your computer, you'll probably want
to transfer them into usable media that can be played on your CD, MP3
or tape player. At this point it would be a good idea to make sure that
you made your sound file large enough to play for 30-60 minutes, or
at least have a collection of several different sounds to equal the
same amount of time to get the most out of your recordable CD. If you
have already, then the next step is to transfer the media to CD. To
do this you'll need another program for converting the files into Wave
(.wav) format. This process is easily understood
and executed. The program I use is as simple as right clicking on the
file and selecting Convert, it is called dBpowerAMP
and is available for free use from the download sites mentioned earlier
in the article, (www.download.com)
do a search for dbpoweramp. When the program
finishes downloading, find where you saved it and double click its icon
to begin installation. After the program is installed it is immediately
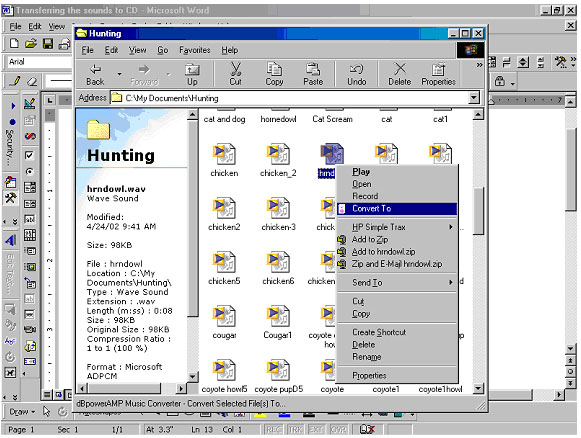
ready to convert your files. Now go to your folder where you have your files saved and with the RIGHT mouse button click on one of the sounds and select Convert To, as shown below.
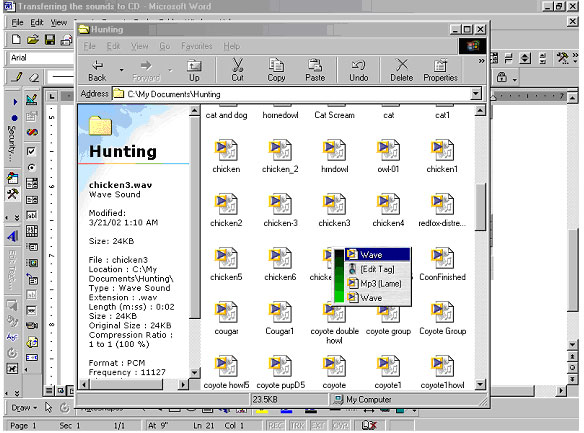
When you click on Convert To, this will open a small window and will automatically place your mouse cursor on Wave, shown below.
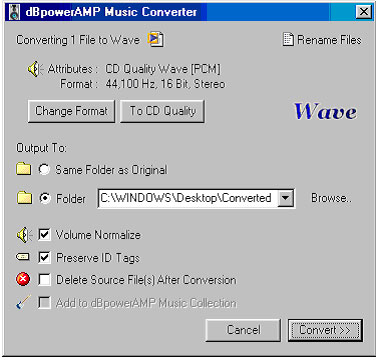
Since all CD players read the Wave format, this is what you will want to select, unless you use a MP3 Player, then you will select Mp3 (Lame). After you click your desired format you will be prompted to select where to save the file (C:\WINDOWS\Desktop\Converted Music) is the default and is a good idea to leave the selection. It also has the options of which format to save to, Choose CD quality and check the boxes for Volume normalize and Preserve ID Tags, as shown below. Back To Top
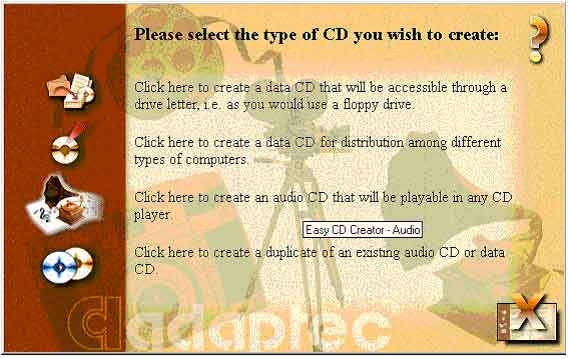
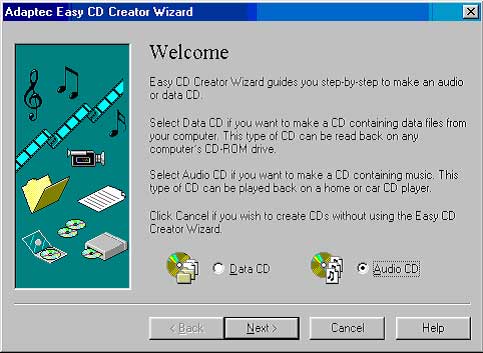
If you're sure you won't require the original file taking up space on your computer, you can choose to Delete The Source File(s) After Conversion option. Personally, I keep every sound I have in case I want to use it again in the future, but sound files take up enormous amounts of memory or hard drive space and small clips can add up quickly. Now that you've completed converting your sound files into the desired format, it's time to send them back to a CD, tape or Mp3 player. To transfer them onto a CD you'll need a "Burner" or CDR/W, which is a piece of hardware that is physically installed on your computer. There are no specific instructions for this equipment in this article as each may be different by manufacturer specifications etc. The Burner I use is HP and was on the computer when I bought it. It's what I'll use as a guide for taking you through the process of making your own CD's. Assuming that you have a CD burner and at least one blank recordable CDR, CD Recordable Disc and have made it this far, then the process that seems to have taken so long is about to meet its end. Take your Blank CD and place it in the tray of the CDR/W and close the tray, this should automatically start the required programs for burning your CD. Now follow the on screen instructions as provided by the CD Burner. The opening screen on mine looks like the one pictured below.
As you can see the steps are self explanatory, in my case, I would click where it says, "Click here to create an audio CD that will be playable in any CD player. After clicking that, I get a prompt that asks a few questions about what I am trying to do, also shown below. Back To Top
Since
I am creating an audio CD I have selected the appropriate box. And now
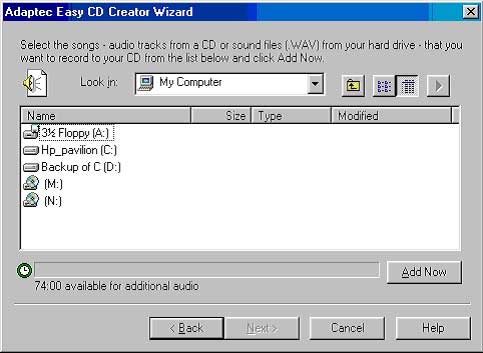
click "NEXT". When Next is clicked it takes me to the window which asks where my files are stored and which ones I want to select or place on the CD, see below.
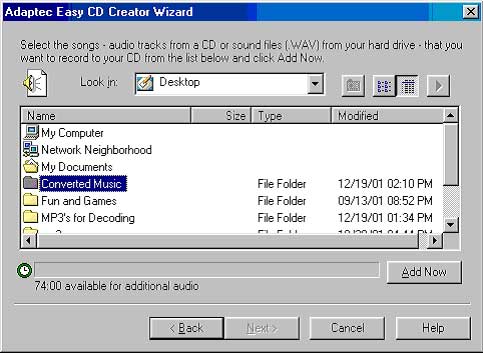
So direct the program to your sound folder, if you used the default provided by dBpowerAMP, you should click on the folder next to the small window where it says My Computer, by clicking, this takes you up one level, in this case to the Desktop. On the Desktop you will see the folder "Converted Music" listed, double click on that folder, as shown below.
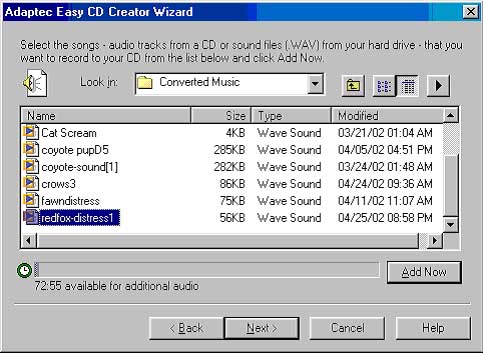
Now, in this folder you should see the sounds you converted to Wave format that can now be transferred to CD. Select the ones you want to copy to the CD, as shown below. Back To Top
As you select the files the graph at the bottom of the window shows the available time left on the CD for recording. I try to fill this as full as I can get it, in order to get the most from the CD. In the background you may also notice your file list being placed in the order in which you chose the files to be placed to the CD. This window also offers all of the above information about your CD to be, including the file names and any other relevant information relating to what you are doing. You can also choose the Jewel Case layout from this window, which is a program for how you want the sounds listed, design for the covers, any labels you may wish to stick to the CD or whatever. I do not use these features as they are only for cosmetic purposes in my opinion, all I do after I finish recording my CD is take a Marks-A-Lot and write on the CD what it contains, since most of mine only contain one or two sounds at the most. Anyway, getting back on track, this is the final step in creating your CD, and after it "pops out of the oven" you can put it in your CD player and try it out to make sure it works. If you are transferring the sound back to Tape, then go to the next step, otherwise, Good Luck and Happy Calling!!
Using the Radio Shack cable that should still be plugged into your computer or Tape player, now you will need to reverse the process, by plugging in to the speaker outlet from the computer and into the Mic jack on the tape player. Once you have secured your plugs and have placed a recordable Tape in the tape player, you can begin transferring the sounds back to the tape by pushing Record or a combination of Record and Play, depending on your particular recorder. Push the corresponding button(s) and begin playing the finished version of your sound file, this should record directly on to the tape and as soon as it is finished it is ready for use. You can delete the finished version of the sound (30-60 minutes in most cases) and keep the original clip (5-30 seconds) for future use and mixing. You are now finished and may begin calling so Good Luck and Happy calling!! Back To Top
If
you have an Mp3 player that you plan on using for your caller, you are
offered more options in the use of sound files, for one, you don't have
to make a 30-60 minute presentation of a screaming animal, Mp3 players
have the ability for instant infinite looping, which means you can use
the sound clips instead of the full size version required for some CD's
and all Tape player model callers. Using Mp3 players also have other
advantages as opposed to the mechanical players; there are no moving
parts in an Mp3 player, thus offering less chance of failure. To transfer
your sound clips to your Mp3 player, simply follow the instructions
provided with the unit when you purchased it, this involves plugging
the unit into the computer port and selecting the files you wish to
use and selecting transfer or upload. Once complete, hook up your unit
as normal and begin using it in the field. Please remember that using
copyrighted files without permission is theft, and is punishable by
fine and possible imprisonment for violation of copyright laws. Predator
Masters is not responsible for any illegal use of these instructions
and does NOT condone the use of copyrighted material. Be responsible
and be ethical, you represent ALL hunters and your actions reflect the
way others see us as sportsmen. Back To
Top Robert Cobb (Stretch)
|

|
| Home | About
Us | Moderators
| The
Prey | Articles
| Techniques
| Tech
Section | Product
Reviews | Sponsors
| Links |
Contact
Us | The
Predator Masters Forums | Photo
Gallery | Scholarships
|
© 2000-2006 Predator Masters™, All Rights Reserved. This material may not be published, broadcast, rewritten, or redistributed.
Question about the website?: Webmaster@PredatorMasters.com