|
| Home | About
Us | Moderators
| The
Prey | Articles
| Techniques
| Tech
Section | Product
Reviews | Sponsors
| Links |
Contact
Us | The
Predator Masters Forums | Photo
Gallery | Scholarships
|
![]()

By Robert Cobb (Stretch)
|
Disclaimer
Downloading copyrighted sounds from call manufacturers websites, for use as homemade calls, without their express written permission is THEFT!! There are no other words for this; it is illegal and punishable under copyright laws of the US and other countries. Predator
Masters
and its affiliates are strongly against using pirated sounds and in
no way condones the use of these instructions for the purpose of stealing
copyrighted information, software or electronic files and media. Use
of these instructions for the purpose of stealing could result in permanent
removal, and may keep any future instructional articles from being published.
There are free sounds all over the Internet that can be downloaded and
made to be just as effective as ANY commercial media!! Be responsible
and ethical..Don't ruin it for everyone!! |
|
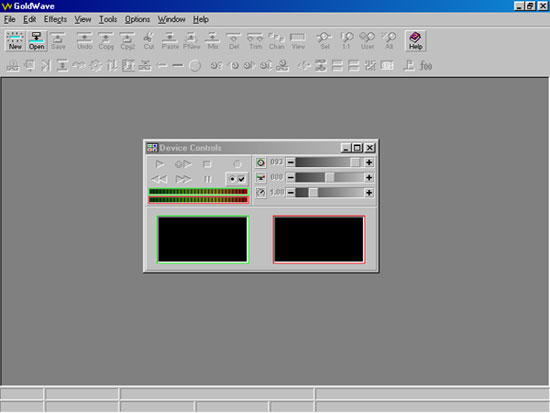
Using Goldwave effectively is like anything else in life; it takes practice to become proficient, and a lot of reading and learning to become advanced in the program. I'm still learning about this software and I've been using it for going on 6 months now. But it's been a great learning experience and is actually quite fun, as it causes you to use your imagination when creating sounds. The best advice I can give concerning this program is READ the DIRECTIONS!!! I will only cover the basics in the use of Goldwave; as to even attempt to go into any detail would take several weeks to write about, not to mention my lack of knowledge when it comes to the advanced features of the program, like I said, I'm still learning the software and it seems that with each use, I learn another feature that I didn't know about the last time I fired it up. When you open Goldwave you'll see what looks like a blank window with a smaller window that has a few buttons for recording and playing the sounds, none of the other buttons are active at this time, which makes the program look "empty". As soon as you click Open or New, all of these empty buttons will come to life, so to speak. And this is where the fun begins.
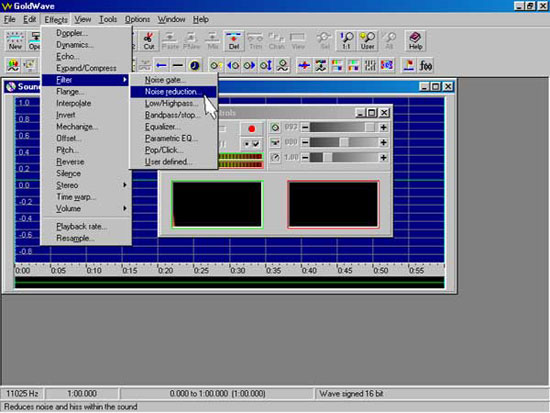
Once you open your sound file, you'll have many options at your disposal for cleaning, copying, mixing, adding silence, and the list goes on. As stated above READ the directions FIRST. They will answer many questions you may have and will get you started in the right direction a lot easier and faster than I can in this article. I'm giving you the basics. Now that you have your sound file open click on the Play button in the smaller window to listen to it and check for background noise, hiss, clicks or any other unsavory noise that shouldn't be there, if you find some bad noise in the recording then click on Effects from the large main window and highlight Filter, this will open a drop down where other options are available, you want to choose Noise Reduction or Pop/Click, depending on the noise you are attempting to get rid of. As shown below.
After you select the Filter you need, this will open a new window, I suggest leaving the settings as they are and clicking on OK. The default settings will take most of the bad noise out of the file, and you can repeat the clean as needed to remove even more if for some reason the first clean doesn't have the desired effect. After you've cleaned your file, you can start using the copy feature to make it loop. This can be time consuming unless you use a few shortcuts, one that I use is to copy the sound (Control C) and then paste behind (Control P) the original sound a few times, then highlight all of the new files and copy it again, then paste it with the new bigger section, thus making the original few seconds of sound into many more seconds which makes the process shorter. Practice it a few times and it'll be less confusing.
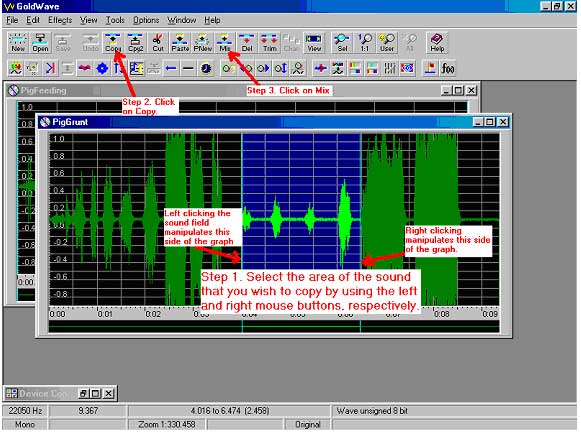
Once you've cleaned up all of your sounds, you may want to start getting into the more advanced operations of Goldwave, such as mixing the sounds. In order to mix sounds, you must have more than one source, however, this does not necessarily mean more than one file, you can mix one file with itself by using the Copy command and then by clicking MIX, this will offset the original sound source and lay, or "MIX" what is on your clip board into the original sound. Or you can use two or more different files and mix them together in almost the same manner, as shown below.
As
you can see by the illustration, mixing sounds is literally as easy
as 1, 2, and 3. After you mix the sounds and get the desired effect,
make sure to save the file by clicking on File
and then Save As… and name the file
something different from the original, this way you can keep the original
for future use. Now go to the next step.
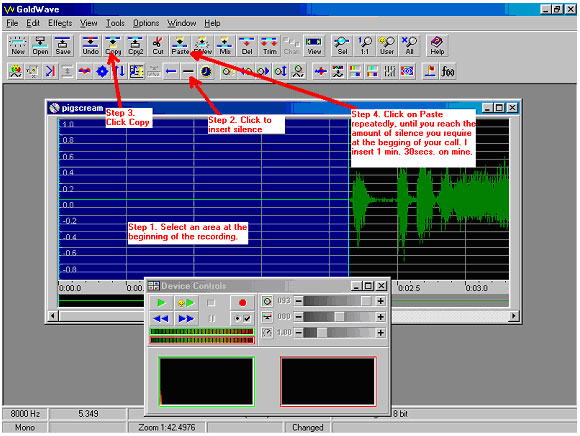
After you have finished your masterpiece, you'll need to insert or re-insert silence at the beginning of the call, so when you turn on the player you have ample time to hide before all of the screaming starts. How much time you insert is strictly up to you, I don't run fast, so I require at least 1 minute and 30 seconds at the beginning of a stand so I can make it to my hiding spot without tripping and breaking arms or legs or shooting myself in the process. Allow yourself plenty of time in the beginning of your calls. I've also found that it's a good idea to label how much silence is on the CD, that way you can judge the placement of the E-caller accordingly. There are basically 4 steps to inserting silence on your CD. 1. With your mouse, click at the beginning of the sound file using the left mouse button and then the right mouse button, hopefully there is a little space at the beginning of your file, which will allow you to spread the highlighted area.
The above steps are illustrated in the picture below, and should be enough to get you started. Good Luck!!
Robert
Cobb (Stretch)
|
![]()
|
| Home | About
Us | Moderators
| The
Prey | Articles
| Techniques
| Tech
Section | Product
Reviews | Sponsors
| Links |
Contact
Us | The
Predator Masters Forums | Photo
Gallery | Scholarships
|
© 2000-2006 Predator Masters™, All Rights Reserved. This material may not be published, broadcast, rewritten, or redistributed.
Question about the website?: Webmaster@PredatorMasters.com