

You are using an out of date browser. It may not display this or other websites correctly.
You should upgrade or use an alternative browser.
You should upgrade or use an alternative browser.
Reloading Bench....
- Thread starter DotZero
- Start date
Retooferab
New member
go to the highroad.org or the firingline.com you will see all you want.
xcrider
New member
Here are quite a few pages of benches for you... Reload Bench pictures
DennisP
New member
Try This. There are some really cool pics
http://www.predatormastersforums.com/forums/ubbthreads.php?ubb=showflat&Number=1155096&page=1
http://www.predatormastersforums.com/forums/ubbthreads.php?ubb=showflat&Number=1155096&page=1
Kracker
New member
Originally Posted By: xcriderHere are quite a few pages of benches for you... Reload Bench pictures
OMG did you guys see the guy on there Rembrandt's set up holy crap that is nice!
OMG did you guys see the guy on there Rembrandt's set up holy crap that is nice!
OldTurtle
Moderator - Deceased
Quote:OMG did you guys see the guy on there Rembrandt's set up holy crap that is nice!
I really liked the way he had mortised the channels into the top of the bench so that he could slide his stuff around or totally dismount it for more room, as needed....
I think I'll need to pick the brains of some of the guys at Home Depot to see if I can find something similar.... It would sure open up my benches...
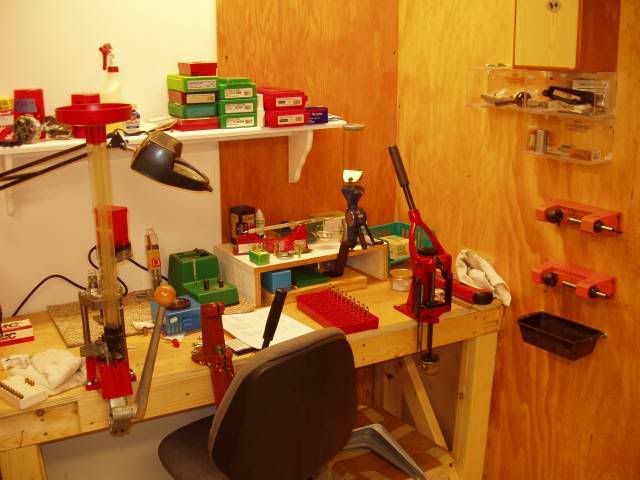
This is my homemade bench for reloading:
And this is my second (commercial) of three that I use for cleaning and repair:
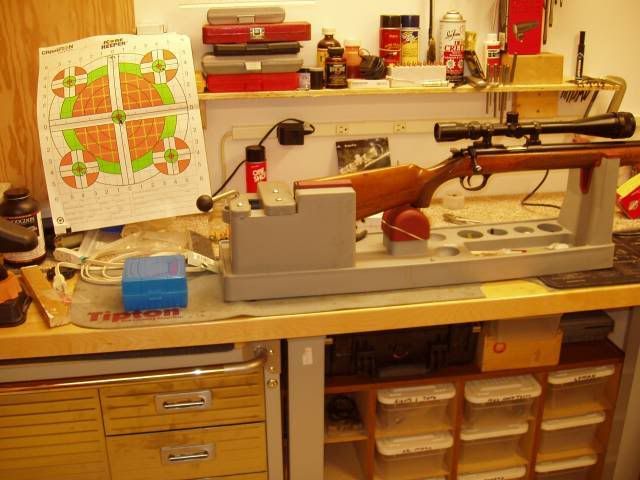
Both have since had wall shelves added above them to hold brass and dies...my powder and primers are kept in a cabinet under the second bench...
I really liked the way he had mortised the channels into the top of the bench so that he could slide his stuff around or totally dismount it for more room, as needed....
I think I'll need to pick the brains of some of the guys at Home Depot to see if I can find something similar.... It would sure open up my benches...
This is my homemade bench for reloading:
And this is my second (commercial) of three that I use for cleaning and repair:
Both have since had wall shelves added above them to hold brass and dies...my powder and primers are kept in a cabinet under the second bench...
Old Turtle,
I use the barbed T-nuts in the bottom of my benches. It allows me to run bolts down through the loader/trimmer/etc and tighten them up good. When done I can remove them and leave only a few small holes in the top of the bench. Reattachment is very quick and easy. Also, the holes can be "filled" by running the bolts up from the bottom untill they are flush with the table top. This eliminates little things falling down the hole.
This works very good for my shotgun loaders. Can switch from 410 to 20 to 12 in minutes and dont need to take up 8 ft of bench space having them all mounted and not removable.
B
Kracker
New member
yeah I was just going to drill the holes for the reloading stuff in the bench and then I can move stuff out of the way if need be but still be able to have the trimmer and what not secure when in use. but I also might have to look into the T channel stuff but I am thinking of putting a sheet metal top on my reloading desk Decisions Decisions lol my kid should be here soon haha rp
Martyn4802
New member
I've built about a half dozen benches over the years. Every time I moved to a new location, I'd build a new bench.
My latest bench is built with 2'x10" boards, 8 feet long; three boards deep, so I have a bench that's 30" wide, and 8 feet long.
I designed the sub structure so the bench top does not move, ever. It takes two men and a boy to lift the bench, just exactly the way I wanted it. Nothing worse than having a bench wabble around on you when weighing powder charges, etc.
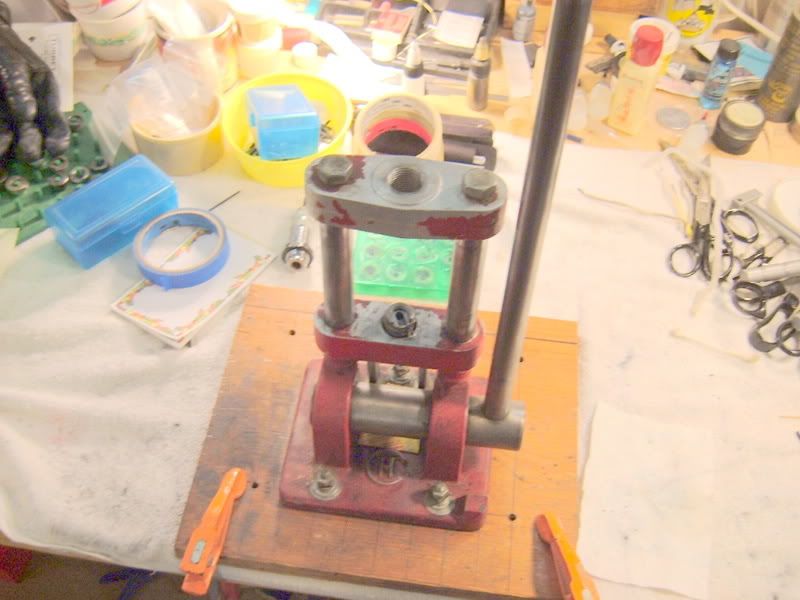
I'm posting a pix of one of my loading tools, and how I mount them all on top of the bench, with large "C" clamps. I like the flexibility of moving loading presses off the bench so I can use the bench top for other work, like making knives. I have two other benches for cleaning rifles, doing stock work, and for vises I use to hold knife blades.
I like having the bench open underneath for storage, and for a place to put my legs while using a loading press.
My latest bench is built with 2'x10" boards, 8 feet long; three boards deep, so I have a bench that's 30" wide, and 8 feet long.
I designed the sub structure so the bench top does not move, ever. It takes two men and a boy to lift the bench, just exactly the way I wanted it. Nothing worse than having a bench wabble around on you when weighing powder charges, etc.
I'm posting a pix of one of my loading tools, and how I mount them all on top of the bench, with large "C" clamps. I like the flexibility of moving loading presses off the bench so I can use the bench top for other work, like making knives. I have two other benches for cleaning rifles, doing stock work, and for vises I use to hold knife blades.
I like having the bench open underneath for storage, and for a place to put my legs while using a loading press.
Last edited:
Little_Weaz
New member
I bought my trimmer from an "old guy" at work. He was our boiler operator and used to reload at work back in the day. He had multiple trimmers and he made me a deal on an RCBS trimmer. He had mounted it to a small piece of plywood about 1' by 10". He then used a "C" clamp on the plywood to hold the trimmer to the bench. I have continued to use this method. It makes a quick mount that puts away easily. I recommend getting it off of the kitchen table before the little lady gets home though.
Weaz
Martyn I think we were typing at the same time!!
Weaz
Martyn I think we were typing at the same time!!
Last edited:
OldTurtle
Moderator - Deceased
2Gunner, I like the idea of the 'T' nuts...that would be a lot cheaper and just about as flexible for my needs...I just want to create a little more 'elbow' room for when I'm working and don't really have room to extend the benches...
My old 'gun room' used to be a few feet smaller in each direction and I expanded this one when we moved...now I wish I had been able to go another two feet...

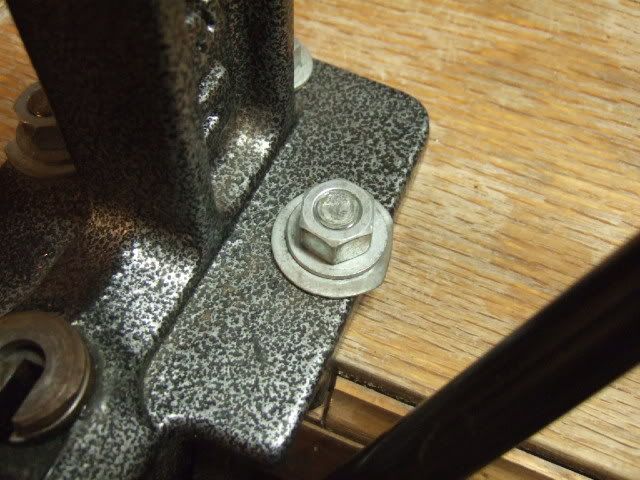
Part of my problem though, right now is that at least two lag bolts currently holding each press in place is all the way down into the support 2x4 Framework below the bench top... I'll have to figure out how long I will need the new bolts and then drill the holes all the way through...
My old 'gun room' used to be a few feet smaller in each direction and I expanded this one when we moved...now I wish I had been able to go another two feet...
Part of my problem though, right now is that at least two lag bolts currently holding each press in place is all the way down into the support 2x4 Framework below the bench top... I'll have to figure out how long I will need the new bolts and then drill the holes all the way through...
Here's mine I recently built. No plans, just knew what I wanted. Work surface and shelves are 4' by 2'. The presses are mounted to 5/16 steel plate that is secured to both the bench top and the legs. The legs are the composite material they use on artificial decks. Very straight, and they weigh a ton. No flex what so ever.

Last edited:
Matt N.
New member
I am using an old metal desk with 6 drawers and a 1 inch thick wood top. On the desk I have mounted the bookcase headboard off an old water bed. This rig is built like a tank and I only have $25 in it. One end is reloading, the other is fly tying. It looks good too. I know where there is a really heavy old all metal military desk that would work great, and I could have that for free.
OT,
I had the same problem on my first bench with my big presses. I now use threaded rod cut to the correct length. Put a nut and washer on one end. You can lock tight it if you want. Make sure you have a long drill and go all the way through. Washer and nut on the bottom. Tighten the bottom nut to get it all snug and the rod should stay flush with the top of the top nut. Takes up the same space on top as a bolt. the bonus is that it "sandwiches" everything together. You can also add a larger support piece on the bottom to spread the force around.
Side bolts on my Lyman single stage from the top.
Below the Lyman. Under the bench top is a 1 1/4" piece of hardwood. It extends back about a foot or so. I put one drywall screw through the bench top into the hardwood to hold it while I drilled. Now, bolted and sandwiched together, the extention of the wood acts like a lever and transfers force (down on the handle/up on the bench.) It gives the bench "extra weight" kinda like traction bars on a vehicle.
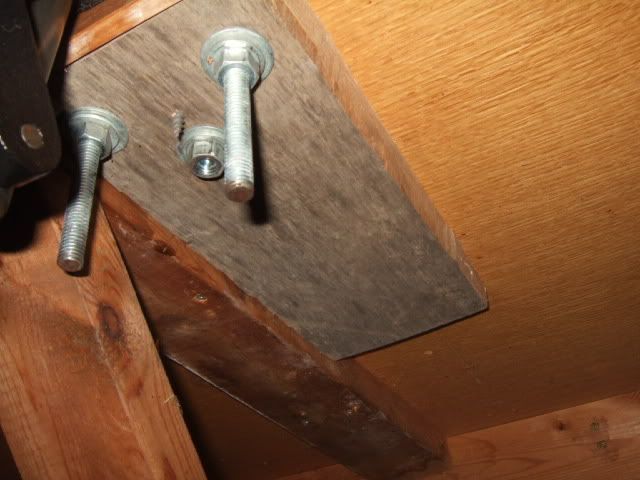
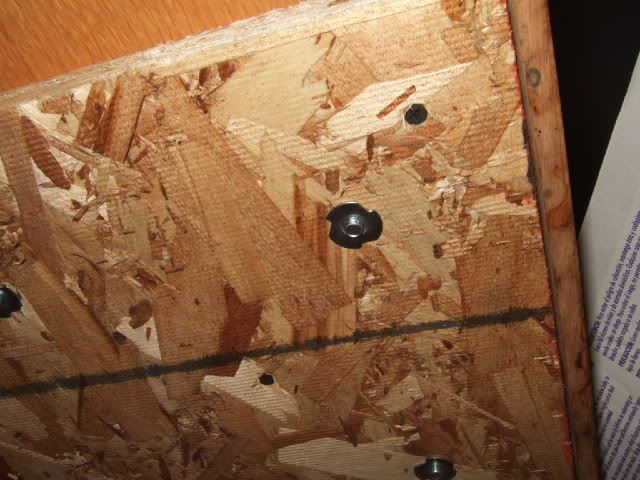
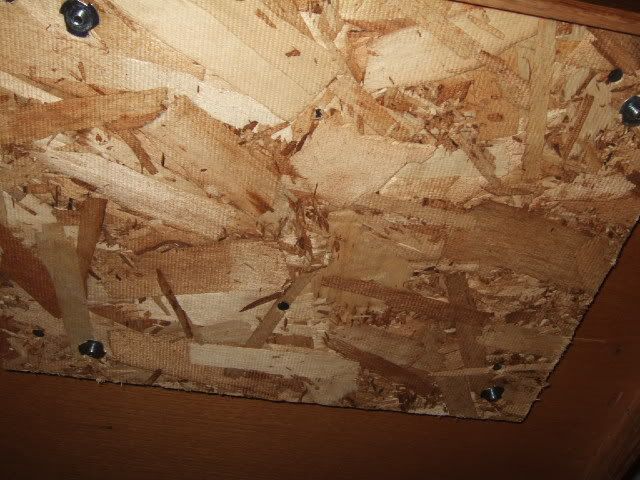
T-nuts in a larger support below my bench. This one is under the MEC9000. Particle board was screwed up from underneath. holes drilled down from the top to fit the pattern of the loader. Particle board was counter bored for the larger barrel of the T-nut.
Under the Dillon.
B
I had the same problem on my first bench with my big presses. I now use threaded rod cut to the correct length. Put a nut and washer on one end. You can lock tight it if you want. Make sure you have a long drill and go all the way through. Washer and nut on the bottom. Tighten the bottom nut to get it all snug and the rod should stay flush with the top of the top nut. Takes up the same space on top as a bolt. the bonus is that it "sandwiches" everything together. You can also add a larger support piece on the bottom to spread the force around.
Side bolts on my Lyman single stage from the top.
Below the Lyman. Under the bench top is a 1 1/4" piece of hardwood. It extends back about a foot or so. I put one drywall screw through the bench top into the hardwood to hold it while I drilled. Now, bolted and sandwiched together, the extention of the wood acts like a lever and transfers force (down on the handle/up on the bench.) It gives the bench "extra weight" kinda like traction bars on a vehicle.
T-nuts in a larger support below my bench. This one is under the MEC9000. Particle board was screwed up from underneath. holes drilled down from the top to fit the pattern of the loader. Particle board was counter bored for the larger barrel of the T-nut.
Under the Dillon.
B
Last edited:


Hooked
New member
Nice looking bench JRat.for now I`m using some modular type desk`s that wifey picked up for free. They arent the sturdiest but have held up ok so far, and I have a more solid counter next to them for the DPS. I have thought about adding a larger piece to the bottom side to spread the load out.I need to visit photo bucket to share pics I guess? Welcome to P.M.

Idaho_Elk_Huntr
New member
I almost have my reloading/doghouse done. I still might paint or wall paper the interior. It is 8x8 and I should of went bigger but it is built so I can mount axles on it. I still use the man cave to store my powder and primers and it wouldnt fit inside of this shed. I still have a Co-ax press to mount and till I get the heater hooked up I leave my Chargemaster inside the house. I dont know if the display will freeze.
I still need shelves as I only have one. I need a really sturdy shelve for my dies. You you see anything I can improve on please let me know.


I still need shelves as I only have one. I need a really sturdy shelve for my dies. You you see anything I can improve on please let me know.
Idaho_Elk_Huntr
New member
I almost have my reloading/doghouse done. I still might paint or wall paper the interior. It is 8x8 and I should of went bigger but it is built so I can mount axles on it. I still use the man cave to store my powder and primers and it wouldnt fit inside of this shed. I still have a Co-ax press to mount and till I get the heater hooked up I leave my Chargemaster inside the house. I dont know if the display will freeze.
You you see anything I can improve on please let me know.
You you see anything I can improve on please let me know.