


Undrcoverrednek
New member
Hey guys I was trying to ditch my flashlight problem (of making them all the time), but I recently stumbled on something worth sharing: the cheap ebay headlamp killer!
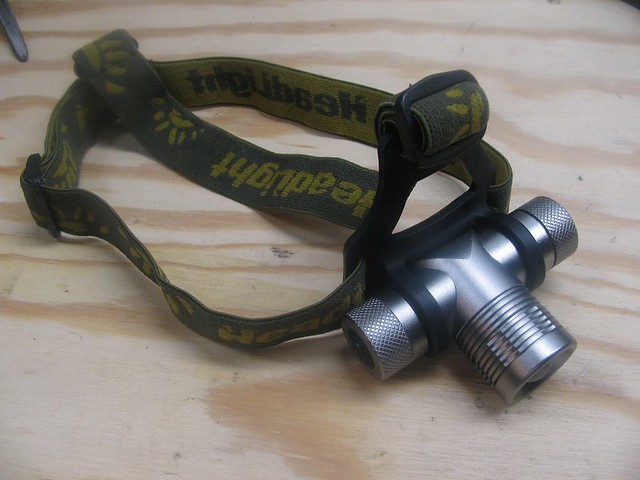
You can find these headlamps on ebay or other places listed a Cree Q5 zoomable headlamp. You can easily rebuild these with a red LED and new driver using a cheap soldering iron, wire strippers, and a small screwdriver.
The headlamps are $8-12. The drivers and LEDs are junk so don’t think you’re getting a great white headlamp. But don’t worry you’ll be buying a new driver and LED.
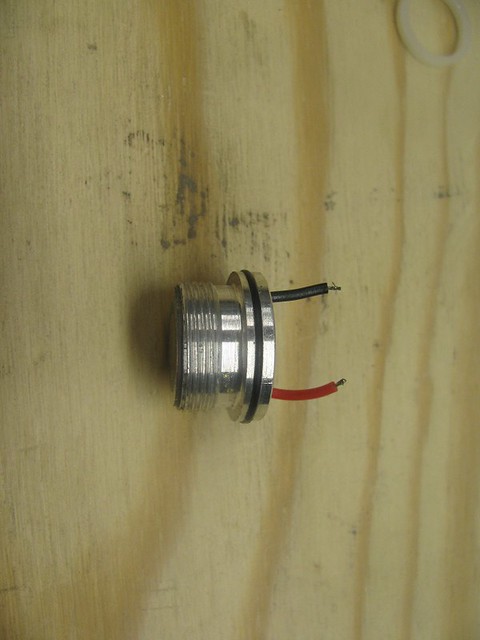
These lights need a one sided driver because of the way the battery springs attach contact the driver. I use a Nanjg 101-AK-A1 1.4 amp driver. I really like to have it flashed with Star off time memory with 15, 33, 50, and 100% modes, but the standard 5, 33, and 100% mode drivers work fine as well. These cost about $4-5.
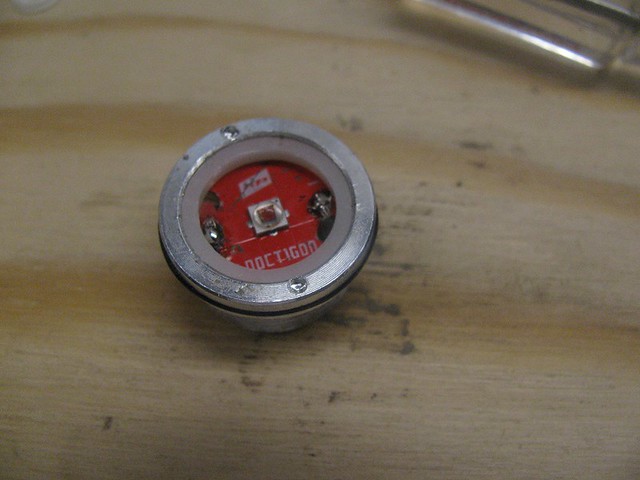
I use a red Cree XP-E2 led that comes premounted on a 16mm Noctigon board. These cost about $7.
You need to use a GOOD battery. Get a good Panasonic/sanyo/brand name cell. I use 3400 mah protected Panasonic cells made by EVVA. They cost about $10.
I scan with these lights “zoomed out” on 33% level and they work great. I was using the old famous cheap ebay headlamp converted to a red LED, but these are better. You can get lower light levels that still reflect eyes a long way out. Also, the high mode is only 1.4 amps so you don’t over heat your LED at all.
Here’s the procedure:
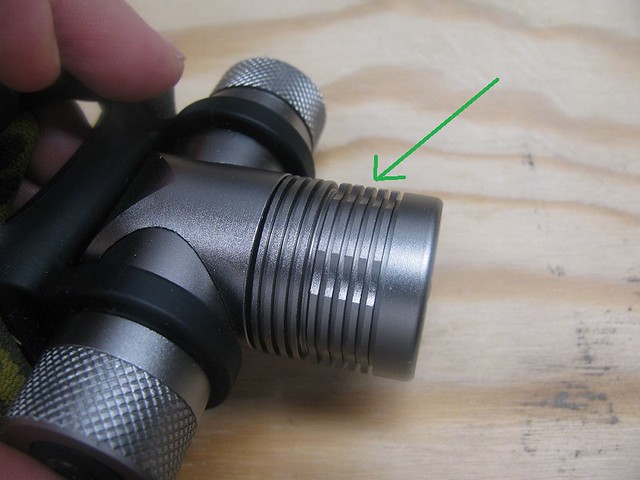
1. Remove the outer bezel (green arrow pointing to out bezel in picture below).
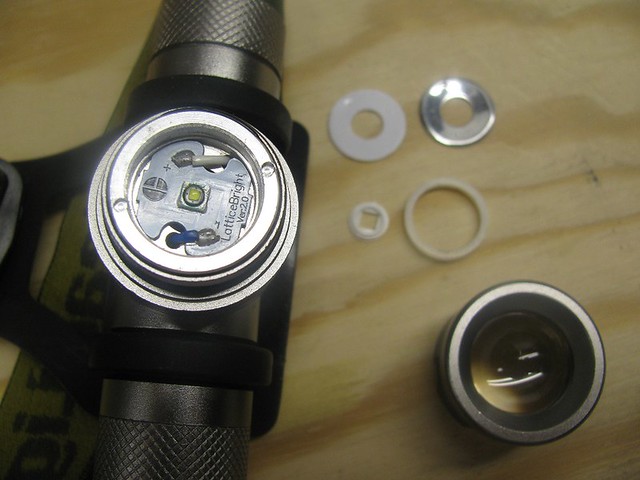
2. Remove the retain ring and little do dads so you can see the LED board solder joints. I use a small screwdriver to help here.
3. Unscrew the rear bezel assembly from the headlamp body.
4. Use your soldering iron (a $5 cheapie will do, I use a Vastar) to remove the wires from the LED board.
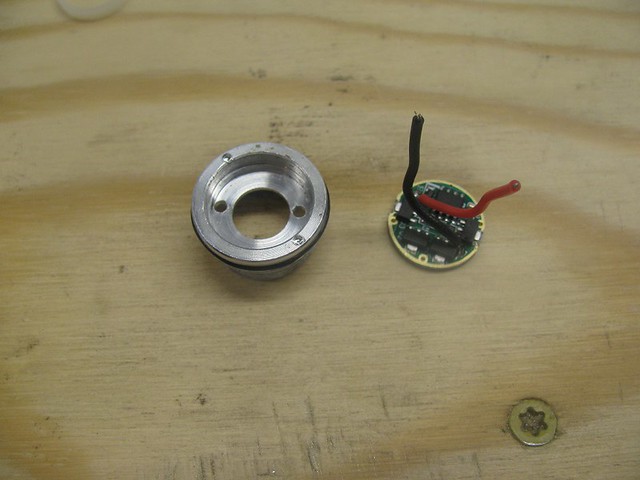
5. Push the pill (this is the aluminum piece the driver and LED board are mounted in) out of the rear bezel.
6. Remove the LED and driver from the pill.
7. Make sure the LED board fits all the way down in the pill. Sometimes they need the edge sanded/filed just a bit to fit.
8. Bend your wires across the driver and fit the wires through the LED wire holes and the driver into the pill. You may need to use a book or something flat to help press the driver into the pill.
9. Put a blob of solder on the + and – pad on the LED board.
10. Put a little thermal compound on the back of the LED board if you have some. I don’t think it’s absolutely necessary, but I use it anyway.
11. Put the LED board in the pill (Remember the black wire goes to the – pad and the red wire goes to the + pad).
12. Bend the wires over to see where you need to cut them. Cut them and strip a little off the end.
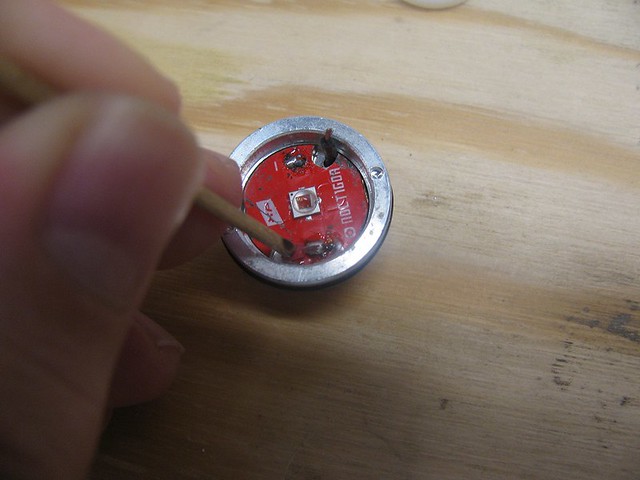
13. I use a toothpick with one side cut off to hold the wires down, then I solder the wired down (one at a time).
14. Re-install the LED board retainer and make sure you push it down so the LED board is fully seated.
15. Assembly is the reverse of disassembly.
Pics below should follow along pretty good with the procedure.
Tip: If you have not soldered before, check out the basic soldering lessons 1 through 4 by paceworldwide on YouTube.
Here is a link to lesson 1:
 IMG_5587
 IMG_5589
 IMG_5592
 IMG_5595
 IMG_5600
 IMG_5602 by Undrcoverrednek, on Flickr
 IMG_5606
 IMG_5608
You can find these headlamps on ebay or other places listed a Cree Q5 zoomable headlamp. You can easily rebuild these with a red LED and new driver using a cheap soldering iron, wire strippers, and a small screwdriver.
The headlamps are $8-12. The drivers and LEDs are junk so don’t think you’re getting a great white headlamp. But don’t worry you’ll be buying a new driver and LED.
These lights need a one sided driver because of the way the battery springs attach contact the driver. I use a Nanjg 101-AK-A1 1.4 amp driver. I really like to have it flashed with Star off time memory with 15, 33, 50, and 100% modes, but the standard 5, 33, and 100% mode drivers work fine as well. These cost about $4-5.
I use a red Cree XP-E2 led that comes premounted on a 16mm Noctigon board. These cost about $7.
You need to use a GOOD battery. Get a good Panasonic/sanyo/brand name cell. I use 3400 mah protected Panasonic cells made by EVVA. They cost about $10.
I scan with these lights “zoomed out” on 33% level and they work great. I was using the old famous cheap ebay headlamp converted to a red LED, but these are better. You can get lower light levels that still reflect eyes a long way out. Also, the high mode is only 1.4 amps so you don’t over heat your LED at all.
Here’s the procedure:
1. Remove the outer bezel (green arrow pointing to out bezel in picture below).
2. Remove the retain ring and little do dads so you can see the LED board solder joints. I use a small screwdriver to help here.
3. Unscrew the rear bezel assembly from the headlamp body.
4. Use your soldering iron (a $5 cheapie will do, I use a Vastar) to remove the wires from the LED board.
5. Push the pill (this is the aluminum piece the driver and LED board are mounted in) out of the rear bezel.
6. Remove the LED and driver from the pill.
7. Make sure the LED board fits all the way down in the pill. Sometimes they need the edge sanded/filed just a bit to fit.
8. Bend your wires across the driver and fit the wires through the LED wire holes and the driver into the pill. You may need to use a book or something flat to help press the driver into the pill.
9. Put a blob of solder on the + and – pad on the LED board.
10. Put a little thermal compound on the back of the LED board if you have some. I don’t think it’s absolutely necessary, but I use it anyway.
11. Put the LED board in the pill (Remember the black wire goes to the – pad and the red wire goes to the + pad).
12. Bend the wires over to see where you need to cut them. Cut them and strip a little off the end.
13. I use a toothpick with one side cut off to hold the wires down, then I solder the wired down (one at a time).
14. Re-install the LED board retainer and make sure you push it down so the LED board is fully seated.
15. Assembly is the reverse of disassembly.
Pics below should follow along pretty good with the procedure.
Tip: If you have not soldered before, check out the basic soldering lessons 1 through 4 by paceworldwide on YouTube.
Here is a link to lesson 1:
IMG_5587 IMG_5589IMG_5592IMG_5595 IMG_5600 IMG_5602 by Undrcoverrednek, on FlickrIMG_5606 IMG_5608
Last edited:
