|
| Home | About
Us | Moderators
| The
Prey | Articles
| Techniques
| Tech
Section | Product
Reviews | Sponsors
| Links |
Contact
Us | The
Predator Masters Forums | Photo
Gallery | Scholarships
|
![]()
![]()
By Rich Cronk, Cronk Custom Calls
|
In
this installment, Rich Cronk of Cronks Custom
Calls will outline the procedures for making your own antler calls.
His howlers and hand calls are the finest custom-made predator calls
found anywhere. This tutorial was copied from some recent posts by Rich
in the Hand Calls Forum. Should you have any questions on these procedures,
Rich would be happy to answer your questions within the forum. If we're
real nice, maybe we can convince Rich to write something up about the
making of howlers!
|
|
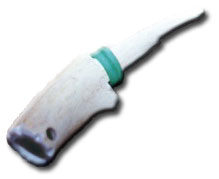
One of the other moderators suggested that I do an online tutorial on how to make a call. I will try to explain the procedures I use to make a deer antler predator call. I started with a point from an old whitetail shed that is pretty weather beaten. First photo shows me getting ready to saw the antler to correct length on a band saw.
|

|
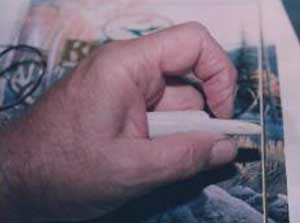
This photo shows how I cut the reed bridge using a belt sander.
|

|
Next, I cut an air groove in the bridge using a dremel tool.
|

|
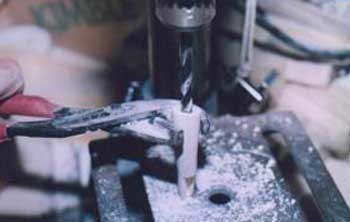
The next step requires extreme care. It involves step drilling a hole which starts at front of the barrel and extends all the way to the air groove. You must always visualize where tip of drill bit is, because you'll drill out through the other side of the antler and ruin everything you've done so far. Also, I have set the belt on my drill press to slip really easy just in case the bit grabs. Be sure to start out with the biggest bit you plan to use and drill that hole first. On this call, I started with a 5/16" bit, drilled as deep as I dared and then switched to a 1/4" bit to drill on through to meet the air groove. Notice the large channel lock pliers that I hold the antler in place with. (I value my arms and hands)
|
|
The reed is cut from polyester film (Mylar). I used .010" stock for this project and I cut my reeds with ordinary scissors. The front of the reed is bent up at a 90 degree angle about 1/4" from the end. This creates a positive stop for the sheep bands I later use to hold reed in place. I am going to try to show this photo full size so that you can all see the reed real good and please also notice the slope of the reed bridge.
|
|
This photo shows the sheep bands holding the reed in place. The small file at bottom is what I use for fine-tuning of the reed bridge.
Note: When I am finished with all sanding and tuning I seal everything with Rustoleum "hardhat" clearcoat. |

|
I like to leave a flat spot about 1/4" long just ahead of air groove. It's best if the hole in the barrel ends up just under the flat spot. This insures that no air leaks out in front of reed when you blow. On this project my bit came out a little too high but I made it work anyway.
|

|
It seems that most of the time, the antler is too crooked to drill all the way to the air groove from the front, so I drill at an angle from the air groove end. Hopefully the holes will meet inside the barrel. Here again is a great danger of the bit grabbing when it meets the hole inside the barrel, so please be careful. Hold those pliers tight and make sure the belt on the drill press is loose so that it'll slip before it pulls your hand into the machine.
Concerning the flat spot ahead of the air groove, when I drilled the hole in the barrel, the bit came out about 1/8" higher than I wanted it to, thus the flat spot was eliminated because of my slight goof. Concerning the air groove, most antlers are curved in such a way as to make it impossible to drill that deep. That fact is the reason why I cut the air groove with a dremel tool. When making calls from plastic rod I use a fixture that holds the rod in place while drilling. The plastic rod being straight also allows me to drill all the way to within 1/4" or so of rod end. The air groove will then be exposed when I saw out the reed bridge portion. One day soon, I will try to show you guys a photo or two of the fixture I use when making voices for killer calls and howlers. |

|
The length of a call is one very important part to consider. When making a call with a barrel that's the same inside diameter from front to rear, there is a point in which more length actually causes a loss in volume. I found this out by trial and error, and one particular howler on the market suffers from this very phenomenon. A really loud call needs a bigger diameter barrel, which is one reason that you see the plastic funnels on some of the more popular howlers. In order to get a wider variation in pitch, you will likely want to make your reed bridge longer. The distance between reed tip and reed-bridge must be greater in order to reproduce the lower notes of say a deer or kid goat bleat. A wider reed will give a lower pitch than a narrow reed but is harder to blow. A wide reed requires a larger air groove under it to compensate. In order for a call to be louder, the barrel needs to be of larger diameter. Cut the bottom out of a plastic pop bottle to make a large funnel. Now stick your predator call in the small end of this funnel and blow. What a large difference in sound you will observe. |
|
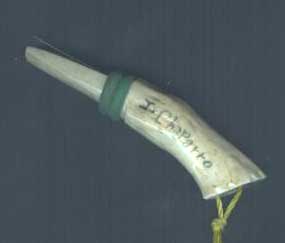
Here is a rather dark photo of deer antler call I made for JasonElPaso.
|
|
It's my understanding that there's an open reed call hiding inside the mouthpiece of most good duck and goose calls. I am about to open the door here for a whole bunch of you younger callers. The very first open reed call that I ever saw with my very own eyes was nothing but an Olt D-2 duck call with mouthpiece removed. Olt used to make a call just like the D-2 only much smaller. This was the call used by many old western coyote men. Most of them just took the mouthpiece off and either lost it or threw it away. I hold the belief that the Tally-ho call was made by slightly changing the appearance of reed assembly on those little Olt calls, and eventually mass producing them. I could be wrong there, but not that much. The endless air groove theory is what Major Boddicker used when designing the Crit'r call line. In my experience with Delrin rod, I like at least 3/4" diameter stock if I'm going to use the endless groove method. Delrin is a little bit rubbery, and I feel that taking the groove all the way to the tip weakens the reed assembly somewhat. If you have a 3" long piece of delrin rod, you'll want to use about half the length for reed bridge. You'll probably want to start by milling a flat spot 1 1/2" long and 3/8" deep for your reed to lay. Then you'll want to mill a steady arch or "bridge" from front of the flat spot out to tip of the rod, with bottom of bridge ending up approx 1/8"-1/4" from bottom of your delrin rod. |
|
| Home | About
Us | Moderators
| The
Prey | Articles
| Techniques
| Tech
Section | Product
Reviews | Sponsors
| Links |
Contact
Us | The
Predator Masters Forums | Photo
Gallery | Scholarships
|
© 2000-2006 Predator Masters™, All Rights Reserved. This material may not be published, broadcast, rewritten, or redistributed.
Question about the website?: Webmaster@PredatorMasters.com